Learn How to Script Porthole

June 2014

Starting with version 1.7.0 Porthole is scriptable using Apple’s AppleScript Editor (or Script Editor in Yosemite). This means that you can automate and toggle certain functions of Porthole without going through the interface.

Index

  1. Use cases
  2. Getting started
  3. Advanced tricks
  4. Notifications
  5. Reference

Use cases

These are a few cases in which scripting could come in handy:

  • Automatically connecting to a certain (or every) speaker on startup.
  • Chaining several actions in one, such as: starting Spotify, playing a song and then connecting to all your AirPlay devices. You can put that in a single script.
  • You could use it to develop a remote control.
  • And obviously any case where you want to control Porthole without going through the interface.

Getting started

  • Launch Porthole at least once and set it up.
  • Start (Apple)Script Editor.app (find it in /Applications/Utilities/(Apple)Script Editor.app).
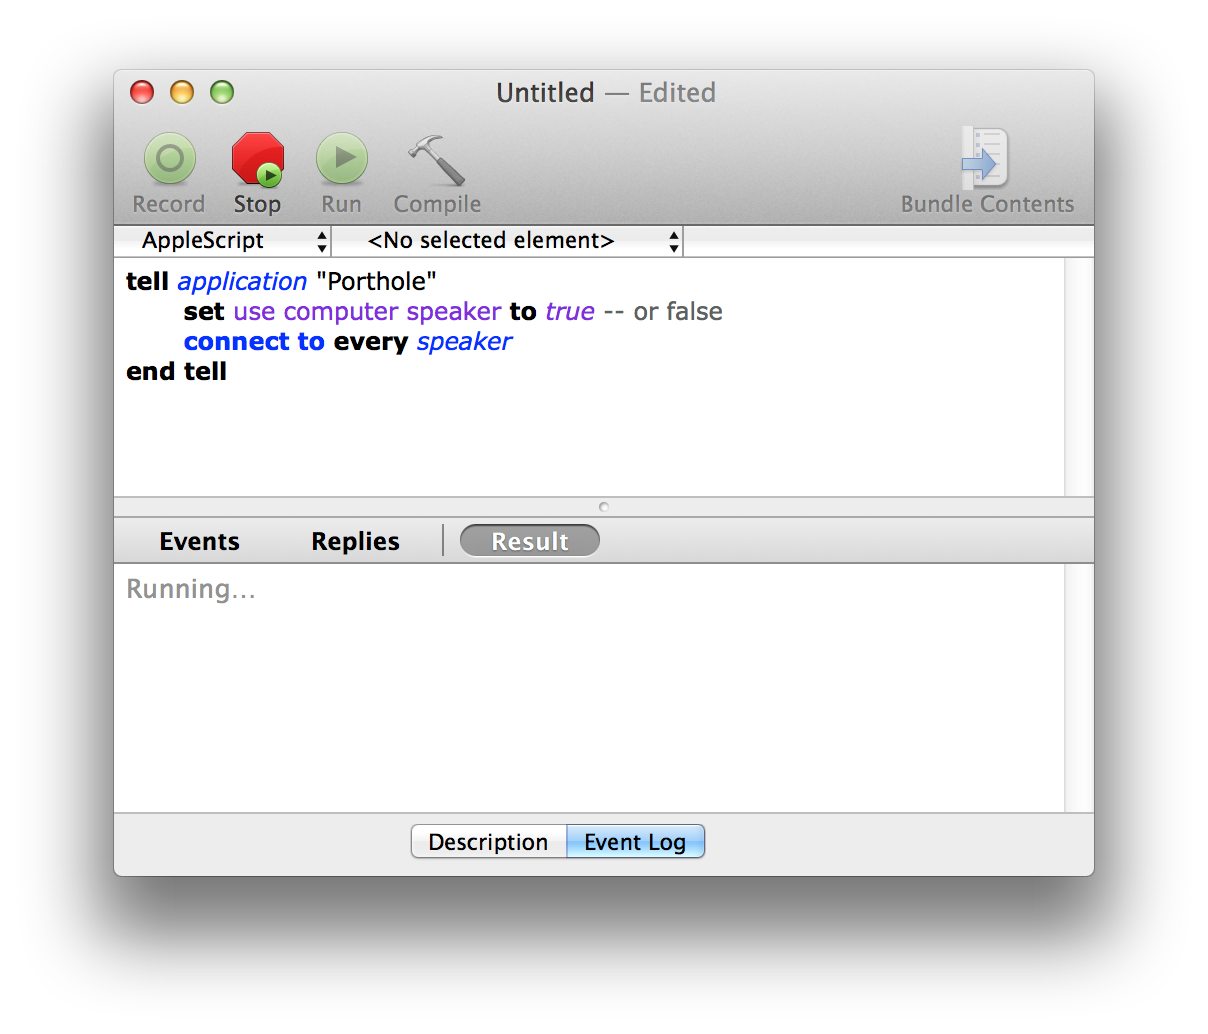
Script Editor

When you have AppleScript Editor running, paste in the script below to get the name of the first speaker Porthole’s found. Press the big green “Run” button when you’re done.

tell application "Porthole"
  name of first speaker
end tell

As you were probably expecting, Porthole should now be connected to the first speaker it found. Pretty sweet!

Advanced tricks

Say that you always want to connect to a certain speaker when your Mac boots up. There are a few things we need to do for this to work:

  1. Get a unique identifier for our speaker.
  2. Use that unique identifier to connect to the specific speaker.
  3. Run the script on startup.

Getting the unique identifier

Run this script:

tell application "Porthole"
  set output to "Speakers:\n"
  repeat with sp in speakers as list
    set output to output & id of sp & ": " & name of sp & "\n"
  end repeat
end tell

It should return something along the lines of this:

"Speakers: 
12AB34CD56EF: Boy & Auk's AirPort Express
FE65DC43BA21: AirPort Express
"

Using the unique identifier

he first value is the MAC address and unique identifier of the speaker, we’ll use this to pick out a specific speaker to connect to.Let’s pick “Boy & Auk’s AirPort Express” in this case. Make sure you replace the id with the value that was returned on your Mac.

tell application "Porthole"
  set sp to (first speaker whose id is "12AB34CD56EF")
  if sp is not connected then
    connect to sp
  end if
end tell

And that’s it, Porthole will only connect to that specific speaker. Run the script to test it.

Run the Script on Startup

You can actually turn Scripts into Applications, which you can add to your Login Items. Perfect, exactly what we need. Before we do this though, lets make a tiny modification to our script.

tell application "Porthole"
  activate
  delay 10
  set sp to (first speaker whose id is "12AB34CD56EF")
  if sp is not connected then
    connect to sp
  end if
end tell

The ‘activate’ command will load Porthole if it isn’t already running. Then the delay will give Porthole ten seconds to discover any available speakers. After that the script runs like it did before.

To turn this into an app, in (Apple)Script Editor, click File → Export… and in the dialog box that opens choose Application under File Format.

Save the file anywhere you like, but remember its location.

Finally, go into System Preferences and select Users & Groups, then Login Items. Press the little + button and pick the Application you just created. Your script will now run at login!

Notifications

Version 1.7.1 and up.

Porthole sends out system wide notifications when an AirPlay speaker appears/disappears/connects/disconnects and when the computer speaker setting is toggled. This removes the need to poll for changes.

To receive these notifications, hook into the NSDistributedNotificationCenter event:

- (void)applicationDidFinishLaunching:(NSNotification *)aNotification {
    // Insert code here to initialize your application
    [[NSDistributedNotificationCenter defaultCenter] addObserver:self selector:@selector(handlePortholeSpeakerStateChanged:) name:@"com.dangercove.Porthole.SpeakerStateChanged" object:nil];
}

- (void)dealloc {
    [[NSDistributedNotificationCenter defaultCenter] removeObserver:self];
}

- (void)handlePortholeSpeakerStateChanged:(NSNotification *)notification {
    NSLog(@"Speaker state changed:\n%@", notification.userInfo);
}

The notification’s userInfo contains a dictionary with the current speaker setup:

{
    speakers =     (
                {
            connected = 1;
            macaddress = 12AB34CD56EF;
            name = "Danger Cove";
        },
                {
            connected = 1;
            macaddress = AB34CD56EF12;
            name = SandroTV;
        },
                {
            connected = 0;
            macaddress = FE65DC43BA21;
            name = "AirPort Express";
        }
    );
    useComputerSpeaker = 0;
}

Reference

These are all the Porthole-specific commands you can use. For a more general AppleScript tutorial, have a look at this guide.

Parameter Description
speaker Addresses a single speaker. Properties: id, name, connected, streaming
every speaker Addresses all speakers.
first/second/…/last speaker Addresses the first/second/etc speaker. You can also use speaker 1,2,3,etc.
connect to [speaker(s)] Connect to the specified speaker(s).
disconnect from [speaker(s)] Disconnect from the specified speaker(s).

General

Command Description
use computer speaker [boolean] Enable or disable the (connected) computer speaker.

This is a property. You can set like so:

tell application "Porthole"
  set use computer speaker to true -- or false
end tell

Grab content from a web browser in your Mac app

January 2014

One of my favorite features of Tapetrap is its ability to subscribe to a website while surfing the web with your browser. Instead of looking for the RSS feed manually and copy-pasting the link, you can click a button and Tapetrap will find and add the feed for you. In this article I want to go over why I think that’s awesome and how it works. The source code for the URL grabbing is available on GitHub.

Adding feeds from your web browser in Tapetrap

Not a browser plugin

I’ve made and use a few browser extensions. They’re neat little applications that take an insane amount of work to maintain. While some code can be shared you will need to tailer parts of the extension for each browser specifically.

For Tapetrap, I chose to make a system wide browser extension in the form of an icon in the menu bar that “just works” with the active web browser when clicked. This means users don’t have to install anything extra and I don’t have to create a plugin per browser. I can’t say I’m the first one to do something like this, but it works particularly well for Tapetrap.

Add feeds while surfing the web

Of course there are downsides to using this approach too. It’s impossible to manipulate the DOM inside the browser or execute other more context aware methods. It’s fine for getting basic information, though.

How grabbing works

This is where it gets a little technical. I combined a basic menu bar app with my own URL grabber code, called DCOURLGrabber, to get the URL from the web browser that was last active.

I’ll skip the menu bar icon part. There are plenty of good tutorials that explain all you need. Instead I’ll talk about how to interact with the web browser.

AppleScript

Yep, AppleScript. Often used to automate tedious tasks, it’s also a great way to interface with other applications. For DCOURLGrabber I focussed on getting the URL from the selected tab of the key window of the web browser that was last active. This is the AppleScript for getting the URL in Google Chrome:

tell application "Google Chrome"
  get URL of active tab of first window
end tell

Simple enough right? For Safari and Opera the command are very similar. The one for Firefox is a little longer.

tell application "Firefox" to activate
tell application "System Events"
  keystroke "l" using command down
  keystroke "c" using command down
end tell
delay 0.5
the clipboard

Hopefully they’ll switch to a straightforward approach in a future update. In any case, after running these scripts they present the current URL of the browser window.

Objective-C

To run this in Objective-C, create a new Mac project in XCode, paste in the next piece of code in the applicationDidFinishLaunching: method and that’s it.

// The script to run. You could also load this from a file as in DCOURLGrabber
NSString *chromeScript =
@"tell application \"Google Chrome\"\n"
"  get URL of active tab of first window\n"
"end tell";

// Load the script
NSAppleScript *script = [[NSAppleScript alloc] initWithSource:chromeScript];
    
// Grab URL using AppleScript
NSDictionary *scriptExecuteError;
NSAppleEventDescriptor *result = [script executeAndReturnError:&scriptExecuteError];
if(scriptExecuteError) {

  // Failed
  NSLog(@"Error: %@", scriptExecuteError);

} else {

  NSLog(@"Output: %@", result.stringValue);

}

Using DCOURLGrabber it becomes even easier. Check the GitHub page for more documentation.

DCOURLGrabber *grabber = [[DCOURLGrabber alloc] init];
NSURL *url = [grabber grabURLFromBundleID:@"com.google.Chrome" withError:&grabError];
if(grabError) {
    NSLog(@"Failed to retrieve URL: %@", grabError);
} else {
    NSLog(@"Got URL: %@", url.absoluteString);
}

Getting the RSS/Atom URL

Websites that value their feeds will link to it from their website. Not only with the well-known orange button, but also through a meta tag in the source code of the website. This gives apps like Tapetrap a way of retrieving it.

The GameKings website has this setup correctly. Inspecting the source of http://gamekings.tv reveals the following lines near the top of the document.

<link rel="alternate" type="application/rss+xml" title="RSS 2.0" href="https://www.gamekings.tv/feed/" />
<link rel="alternate" type="text/xml" title="RSS .92" href="https://www.gamekings.tv/feed/rss/" />
<link rel="alternate" type="application/atom+xml" title="Atom 1.0" href="https://www.gamekings.tv/feed/atom/" />
<link rel="alternate" type="application/rss+xml" title="Gamekings Video's RSS Feed" href="https://www.gamekings.tv/rss?cat=3">
<link rel="alternate" type="application/rss+xml" title="Gamekings Nieuws RSS Feed" href="https://www.gamekings.tv/rss?cat=18">

All links point to RSS feeds. There are some similarities between the lines. Using these conventions, it’s easy to extract them in code. Even easier with OCGumbo, which is a HTML5 parser. It converts RSS into Objective-C objects.

The following lines of code parse a simple HTML page, check the ‘type’ parameter of the ‘link’ meta tag for either application/rss+xml, application/atom+xml, rss+xml or atom+xml and log the link when it matches.

// Create an array that contains the strings that can appear in the 'type' property
NSArray *linkTypeFeedIndicators = [NSArray arrayWithObjects:@"application/rss+xml", @"application/atom+xml", @"rss+xml", @"atom+xml", nil];

NSString *htmlString =
@"<html><head>"
"<link rel='alternate' type='application/rss+xml' title='RSS 2.0' href='http://www.gamekings.tv/feed/' />"
"</head><body>"
"<h1>Feed discovery experiment</h1>"
"<p>Just testing ;).</p>"
"</body></html>";

// Load the document from a string containing HTML
OCGumboDocument *document = [[OCGumboDocument alloc] initWithHTMLString:htmlString];
OCGumboElement *root = document.rootElement;

// Loop through all 'link' tags
[root.Query(@"link") enumerateObjectsUsingBlock:^(OCGumboElement *element, NSUInteger idx, BOOL *stop) {
    NSString *type = [element.attr(@"type") stringByRemovingNewLinesAndWhitespace];
    
    // Check if the type is equal to that of a RSS/Atom feed
    if([linkTypeFeedIndicators containsObject:type]) {
        NSString *feedURLString = element.attr(@"href");
        NSLog(@"Found a feed: %@", feedURLString);
    }
}];

With the URL of the RSS feed in hand, the road is clear to analyze its content using a RSS parser, or maybe use the URL for something different entirely.

Real world example

You can download Tapetrap to get a feel of how this works. The app is now in public beta and free to use. Also let me know what you think and help improve it!

Coucou for web developers

March 2013

If you’re a web developer you probably recognize that moment where you’re running a local development evironment with MAMP/XAMPP, Rails or Node.js and need to see your site on another computer, or show someone else what you’re working on. Maybe to do a cross-browser check, maybe just to show how awesome this latest design looks.

This usually involves copy-pasting of ip addresses, emailing and other such nonsense. With coucou this can be done in just a few simple clicks. Let me walk you through it.

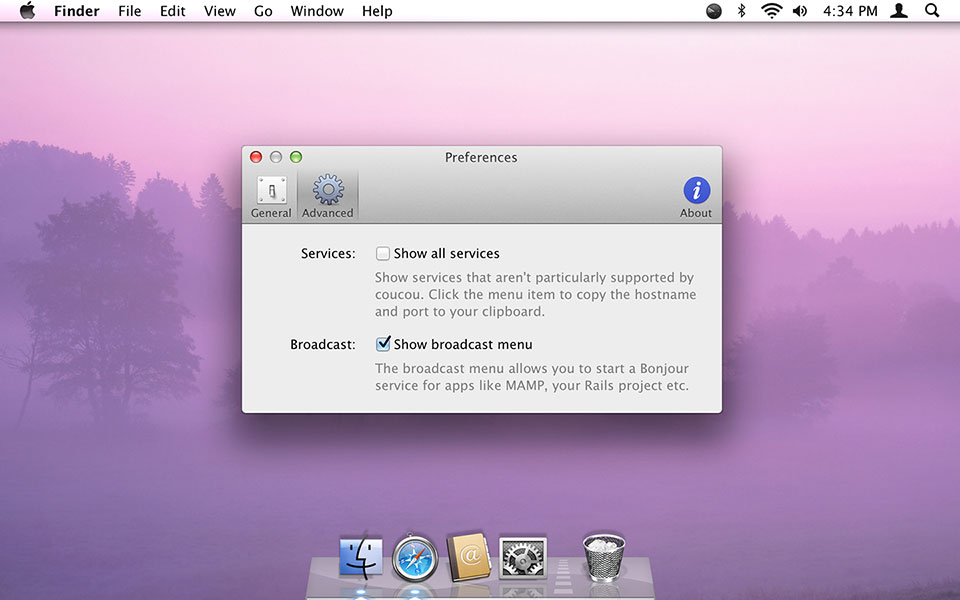
First we need to enable broadcasting in the preferences pane.

Enable broadcasting

Enable broadcasting

Now follow these steps:

  • click the menu bar icon;
  • select Broadcast and click New Service…;
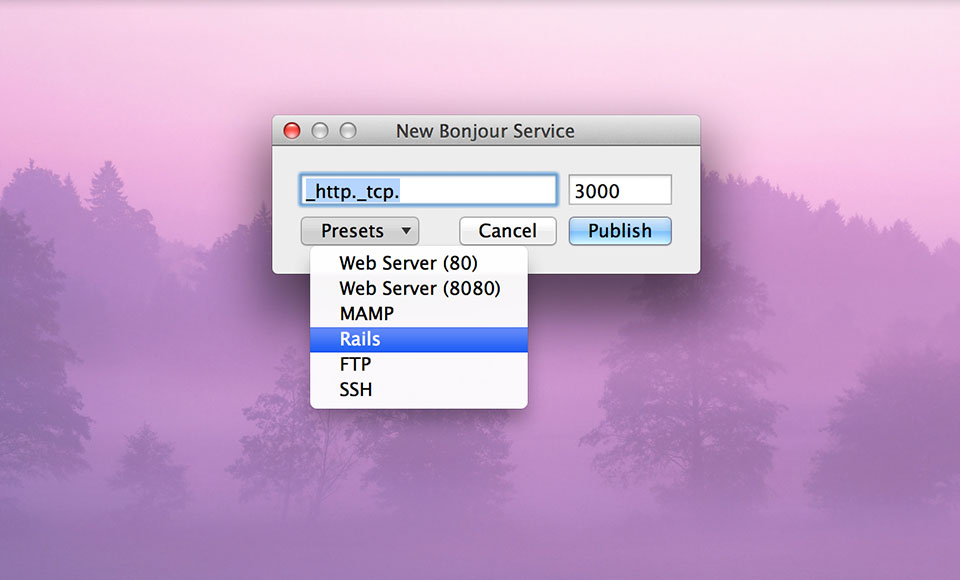
  • select one of the presets in the window that pops-up or create a service manually;
  • click publish and you’re set!

Add a new service

Add a new service

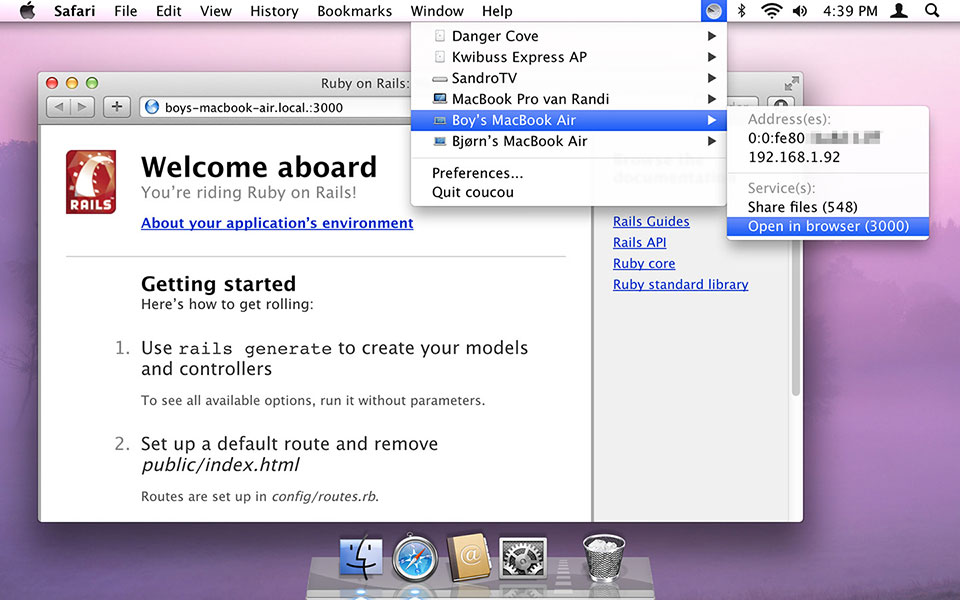
Find a custom service

Your service is now visible for anyone using coucou, or any other Bonjour compatible app

You can unpublish the service by clicking the corresponding entry in the Broadcast menu.

Available on the Mac App Store

Coucou for easy network access

March 2013

Network devices can broadcast various services, so other devices can find them. You’ve probably used this feature before without knowing about it. When you start a Screen Sharing session or browse some files on a network your computer picked up on what other computers in your network were broadcasting.

While its already pretty easy to find these services in Finder, wouldn’t it be awesome if you could do this from your menu bar? Or connect to web servers, SSH, printers, see who’s in and even create your own services? That’s when you need coucou!

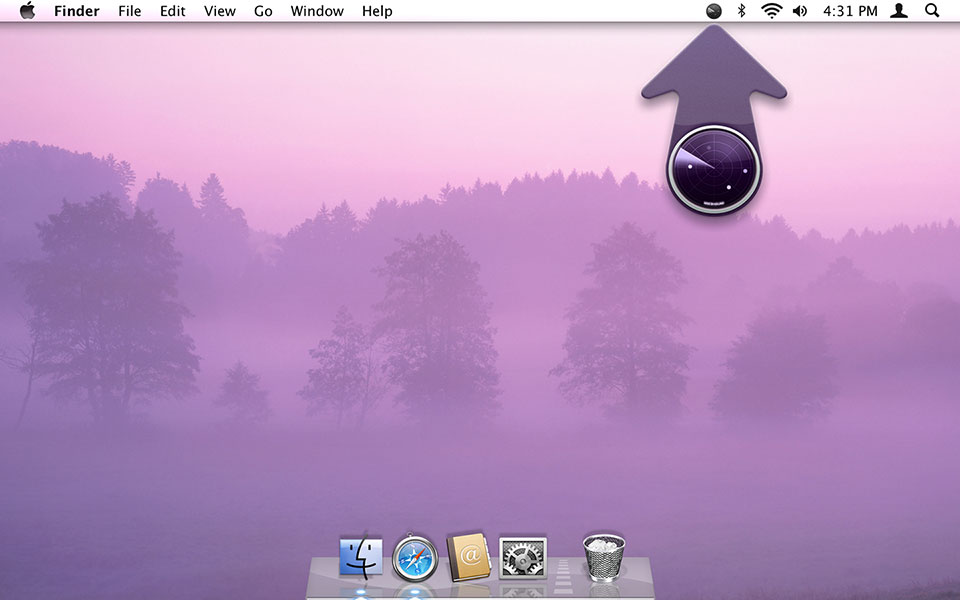
Coucou sits in your menu bar

Coucou is out of your way but easy to reach

See who's online

See who’s online and easily start Screen Sharing of File Sharing

Browse printers

Browse printers and open the web management page

Are you a web developer? Check out this post about using coucou to streamline local web development.

Available on the Mac App Store

Launch at login for sandboxed apps

August 2012

“Launch at Login” was quite simple to implement. It even fits in a single gist: gist.github.com/1409312. Sandboxing changed this and made it “little” more troublesome.

Tim Schröder wrote a great article about this, that combines very well with Alex Zielenski’s StartAtLoginController GitHub project into a Helper Project that’ll allow you to easily add “Launch at login” to multiple Apps.

Tim’s example uses hardcoded information to launch the main App from the Helper App and toggle Launch at Login. Which makes it super easy to understand, but less flexible to use in multiple projects. That’s where Alex’ Controller comes in. It’ll allow you to add the Helper Project to your main Project, add a new target, drag it your main app’s “Copy Files” build phase and be done with it.

This stackoverflow post links to a demo project that has most of the code in place, but doesn’t use Tim’s pretty Workspace method of setting things up. I mixed them together and made a new GitHub project that should help you setup your project pretty quickly.

Check out the source: https://github.com/DangerCove/LaunchAtLogin

Oddities and things you should know:

This will only work if your .app is in /Applications or ~/Applications, making it harder to debug.

Manually running the Helper App from the main App’s Contents folder will sometimes not launch the main app if ‘Launch at Startup’ hasn’t been activated for your app. So first run the app, check the checkbox and try again.