Easily add acknowledgments to your Xcode projects

May 2014

When you’re working on a iOS or OSX app, you’re bound to use a library, framework or other code that was generously shared by other people. The right thing to do (especially when the license requires it!) is to acknowledge that you’re using their work in your app.

There are various ways to go about this, but I’ve just released a script called Acknowledge that will make it very easy. It also works very well with DCOAboutWindow, which I released earlier.

![Acknowledgments] /assets/img/old/content/acknowledge-acknowledgments.jpg)

Acknowledge is a simple bash script that will easily generate a rtf that contains all the acknowledgments for libraries, frameworks and other code you’ve used in your iOS or OSX project.

It’s made to work very well with DCOAboutWindow and Cocoapods. Acknowledge relies on MultiMarkdown by Fletcher Penny.

You can read more about Acknowledge on GitHub, or follow the setup guide below.

Clone

Clone the repo, preferably into the root of your Xcode project:

$ git clone git@github.com:DangerCove/Acknowledge.git

Or if your project is a repo already, add it as a submodule:

$ git submodule add git@github.com:DangerCove/Acknowledge.git

Install multimarkdown

Follow the guide on Fletcher’s website, or if you’re using homebrew:

$ brew install multimarkdown

Configure

Copy acknowledge.cfg.default to acknowledge.cfg:

$ cd Acknowledge
$ cp acknowledge.cfg.default acknowledge.cfg

Customize the paths to multimarkdown and your Pods folder if necessary.

Add acknowledgments

If you use Cocoapods and have your Pods directory setup, you are ready to go. Just run acknowledge.

$ ./acknowledge

Other acknowledgments

Just add a markdown file to the sources directory and Acknowledge will handle the rest. Make sure the extension is .md.

Order

You might’ve notice the 10_ and 20_ prefixes in front of the files in the sources folder. Acknowledge will concatenate the files in order, so just add files and change to number to change the order.

The acknowledgments generated by Cocoapods will always be prepended with 10_.

Potential directory layout

.
|- Acknowledge/
|   |- acknowledge
|   |- ...
|   |- source/
|   |   |- 11_Vendor.md
|   |   |- 20_Acknowledge.md
|- Pods/
|   |- Pods-acknowledgements.markdown
|-  |- ...
|- Podfile
|- Coolproject.xcodeproj
|- Coolproject.xcworkspace
|- ...

Test it

Don’t skip this step, you’ll need to output in the next one.

Open a terminal window and run acknowledge once to see if it works, and to generate the initial Acknowledgments.rtf.

$ ./acknowledge

Fix any errors and proceed.

Add it to Xcode

You’ll probably want to show the acknowledgments somewhere in your app (have a look at DCOAboutWindow if you’re working on a Mac app, btw).

Simply add the generated Acknowledgments.rtf file to your project and display it somewhere.

Generate the acknowledgments on each build

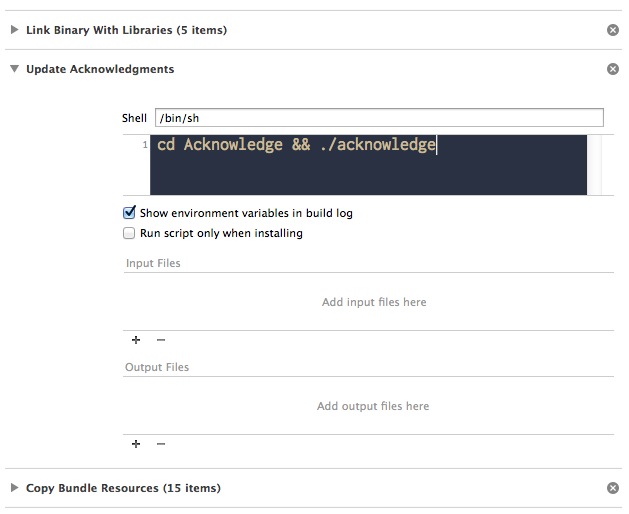
Keeping your acknowledgments up to date is easy if you add Acknowledge as a build phase. Here’s how that works:

  1. Open Xcode;
  2. Select your project and open the Build Phases tab;
  3. Click Editor → Add Build Phase → Add Run Script Build Phase;
  4. Name your script something like “Update Acknowledgments” and position it so that it’s above Copy Bundle Resources;
  5. Now add the following code:

cd Acknowledge && ./acknowledge

(Make sure to adapt the paths if the script isn’t located in the default folder.)

It should look something like this:

Acknowledge build phase

That’s it! Just build your project and you’re set.

Grab content from a web browser in your Mac app

January 2014

One of my favorite features of Tapetrap is its ability to subscribe to a website while surfing the web with your browser. Instead of looking for the RSS feed manually and copy-pasting the link, you can click a button and Tapetrap will find and add the feed for you. In this article I want to go over why I think that’s awesome and how it works. The source code for the URL grabbing is available on GitHub.

Adding feeds from your web browser in Tapetrap

Not a browser plugin

I’ve made and use a few browser extensions. They’re neat little applications that take an insane amount of work to maintain. While some code can be shared you will need to tailer parts of the extension for each browser specifically.

For Tapetrap, I chose to make a system wide browser extension in the form of an icon in the menu bar that “just works” with the active web browser when clicked. This means users don’t have to install anything extra and I don’t have to create a plugin per browser. I can’t say I’m the first one to do something like this, but it works particularly well for Tapetrap.

Add feeds while surfing the web

Of course there are downsides to using this approach too. It’s impossible to manipulate the DOM inside the browser or execute other more context aware methods. It’s fine for getting basic information, though.

How grabbing works

This is where it gets a little technical. I combined a basic menu bar app with my own URL grabber code, called DCOURLGrabber, to get the URL from the web browser that was last active.

I’ll skip the menu bar icon part. There are plenty of good tutorials that explain all you need. Instead I’ll talk about how to interact with the web browser.

AppleScript

Yep, AppleScript. Often used to automate tedious tasks, it’s also a great way to interface with other applications. For DCOURLGrabber I focussed on getting the URL from the selected tab of the key window of the web browser that was last active. This is the AppleScript for getting the URL in Google Chrome:

tell application "Google Chrome"
  get URL of active tab of first window
end tell

Simple enough right? For Safari and Opera the command are very similar. The one for Firefox is a little longer.

tell application "Firefox" to activate
tell application "System Events"
  keystroke "l" using command down
  keystroke "c" using command down
end tell
delay 0.5
the clipboard

Hopefully they’ll switch to a straightforward approach in a future update. In any case, after running these scripts they present the current URL of the browser window.

Objective-C

To run this in Objective-C, create a new Mac project in XCode, paste in the next piece of code in the applicationDidFinishLaunching: method and that’s it.

// The script to run. You could also load this from a file as in DCOURLGrabber
NSString *chromeScript =
@"tell application \"Google Chrome\"\n"
"  get URL of active tab of first window\n"
"end tell";

// Load the script
NSAppleScript *script = [[NSAppleScript alloc] initWithSource:chromeScript];
    
// Grab URL using AppleScript
NSDictionary *scriptExecuteError;
NSAppleEventDescriptor *result = [script executeAndReturnError:&scriptExecuteError];
if(scriptExecuteError) {

  // Failed
  NSLog(@"Error: %@", scriptExecuteError);

} else {

  NSLog(@"Output: %@", result.stringValue);

}

Using DCOURLGrabber it becomes even easier. Check the GitHub page for more documentation.

DCOURLGrabber *grabber = [[DCOURLGrabber alloc] init];
NSURL *url = [grabber grabURLFromBundleID:@"com.google.Chrome" withError:&grabError];
if(grabError) {
    NSLog(@"Failed to retrieve URL: %@", grabError);
} else {
    NSLog(@"Got URL: %@", url.absoluteString);
}

Getting the RSS/Atom URL

Websites that value their feeds will link to it from their website. Not only with the well-known orange button, but also through a meta tag in the source code of the website. This gives apps like Tapetrap a way of retrieving it.

The GameKings website has this setup correctly. Inspecting the source of http://gamekings.tv reveals the following lines near the top of the document.

<link rel="alternate" type="application/rss+xml" title="RSS 2.0" href="https://www.gamekings.tv/feed/" />
<link rel="alternate" type="text/xml" title="RSS .92" href="https://www.gamekings.tv/feed/rss/" />
<link rel="alternate" type="application/atom+xml" title="Atom 1.0" href="https://www.gamekings.tv/feed/atom/" />
<link rel="alternate" type="application/rss+xml" title="Gamekings Video's RSS Feed" href="https://www.gamekings.tv/rss?cat=3">
<link rel="alternate" type="application/rss+xml" title="Gamekings Nieuws RSS Feed" href="https://www.gamekings.tv/rss?cat=18">

All links point to RSS feeds. There are some similarities between the lines. Using these conventions, it’s easy to extract them in code. Even easier with OCGumbo, which is a HTML5 parser. It converts RSS into Objective-C objects.

The following lines of code parse a simple HTML page, check the ‘type’ parameter of the ‘link’ meta tag for either application/rss+xml, application/atom+xml, rss+xml or atom+xml and log the link when it matches.

// Create an array that contains the strings that can appear in the 'type' property
NSArray *linkTypeFeedIndicators = [NSArray arrayWithObjects:@"application/rss+xml", @"application/atom+xml", @"rss+xml", @"atom+xml", nil];

NSString *htmlString =
@"<html><head>"
"<link rel='alternate' type='application/rss+xml' title='RSS 2.0' href='http://www.gamekings.tv/feed/' />"
"</head><body>"
"<h1>Feed discovery experiment</h1>"
"<p>Just testing ;).</p>"
"</body></html>";

// Load the document from a string containing HTML
OCGumboDocument *document = [[OCGumboDocument alloc] initWithHTMLString:htmlString];
OCGumboElement *root = document.rootElement;

// Loop through all 'link' tags
[root.Query(@"link") enumerateObjectsUsingBlock:^(OCGumboElement *element, NSUInteger idx, BOOL *stop) {
    NSString *type = [element.attr(@"type") stringByRemovingNewLinesAndWhitespace];
    
    // Check if the type is equal to that of a RSS/Atom feed
    if([linkTypeFeedIndicators containsObject:type]) {
        NSString *feedURLString = element.attr(@"href");
        NSLog(@"Found a feed: %@", feedURLString);
    }
}];

With the URL of the RSS feed in hand, the road is clear to analyze its content using a RSS parser, or maybe use the URL for something different entirely.

Real world example

You can download Tapetrap to get a feel of how this works. The app is now in public beta and free to use. Also let me know what you think and help improve it!

Glow for updates

October 2013

Everybody knows software updates. A window pops up to notify you an update is available, you accept and a few seconds later you have new features (and less bugs, hopefully).

Automatic software updates are great and generally make everybody’s lives better. As a developer I can be sure most of my customers are using the latest version. As a user you press a single button to update, instead of going to the website, downloading a new package and overwriting the previous version.

All Danger Cove apps (except the ones on the App Store) use Sparkle for automatic updates. Sparkle checks a feed every day and lets you know when a new version is available. Getting that feed online is what I want to talk about today.

Previously I manually edited these feeds and manually wrote the release notes in a text editor. Knowing that I have to look up version numbers, file sizes and sign the update (for security, nobody should be able to release an update in my name). This can take some time.

That’s why I’ve made Glow and if you’re a software developer, it might come in handy for you as well. That’s why I’ve released it on GitHub. Here’s my description of it.

Glow is a tool that generates Sparkle-compatible Appcast update feeds and html release notes for your Mac projects. It’s not a full blown, database driven, multiple project supporting, update releasing laser canon. Rather it’s a clean, easy to use script that will automate 90% of releasing updates to your users.

The GitHub page contains a very detailed walkthrough on how to get started.

Automating the process of creating these updates leaves more time to work on fixing bugs and adding cool new features. Also, I might have some more time to style those release notes :).

Alfred 2 workflow for Reign

August 2013

Alfred 2 Workflow for Reigh

For those of you that are familiar with Alfred, you probably need no explanation as to why a workflow for Reign will come in pretty handy. Read on to learn what it does.

Download the Alfred 2 Workflow for Reign

Alfred saves you time when you search for files online or on your Mac. Be more productive with hotkeys, keywords and file actions at your fingertips.

That’s what it says on Alfred’s website. It basically moves a lot of control to your keyboard, so you can keep your eyes on the task at hand. For Reign this means that you can remote control Spotify running on another Mac by simply entering simple commands, like reign n to skip a track or reign o to open the track that’s currently playing in your own Spotify client, so you can star or share it.

It reduces the need to visit the web interface and makes remote controlling Spotify even faster and easier!

Of course, like Reign, the workflow is open-source and free to share. Visit the GitHub project to contribute and read more about how it works. Or just download the workflow file to get started.

Reign is available on the Mac App Store, for free.

Distractless

November 2012

Reign is now available

August 2012

Reign for Spotify

Our app called Reign is “waiting for review” by Apple. Check reignalot.com to see what’s special about this Spotify remote.

Launch at login for sandboxed apps

August 2012

“Launch at Login” was quite simple to implement. It even fits in a single gist: gist.github.com/1409312. Sandboxing changed this and made it “little” more troublesome.

Tim Schröder wrote a great article about this, that combines very well with Alex Zielenski’s StartAtLoginController GitHub project into a Helper Project that’ll allow you to easily add “Launch at login” to multiple Apps.

Tim’s example uses hardcoded information to launch the main App from the Helper App and toggle Launch at Login. Which makes it super easy to understand, but less flexible to use in multiple projects. That’s where Alex’ Controller comes in. It’ll allow you to add the Helper Project to your main Project, add a new target, drag it your main app’s “Copy Files” build phase and be done with it.

This stackoverflow post links to a demo project that has most of the code in place, but doesn’t use Tim’s pretty Workspace method of setting things up. I mixed them together and made a new GitHub project that should help you setup your project pretty quickly.

Check out the source: https://github.com/DangerCove/LaunchAtLogin

Oddities and things you should know:

This will only work if your .app is in /Applications or ~/Applications, making it harder to debug.

Manually running the Helper App from the main App’s Contents folder will sometimes not launch the main app if ‘Launch at Startup’ hasn’t been activated for your app. So first run the app, check the checkbox and try again.